Knowledge Base
What is a TruView in 3D Laser Scanning?
Leica TruView is the industry leader for easily and intuitively sharing point cloud data, and virtual walkthroughs for a Windows PC. Leica provides this software free of charge and offers two formats for the software: a portable option that can be placed on a USB drive which does not require installation, and a standard desktop installation that installs on a Windows PC. Both versions have specific video card and hardware requirements that must be met to function properly.

TruView utilizes the Leica LGS\LGSX file format which allows for a large amount of data in a smaller file size than offered in other file formats. It allows imagery, dimensional information, and point cloud data to be hosted in one file, making it easy to download and share.
Existing Conditions, a 3D laser scanning company, provides the LGS\LGSX file with every project that utilizes a Leica 3D laser scanner. These files are hosted for free in our Project Delivery folder and can be downloaded or shared easily with others.
Alternatively, if you need to access the Virtual Walkthrough data from any web-enabled device, the Existing Conditions' Virtual Site Visits platform is an easy, secure, and low-cost way to access this same type of project data, regardless of your operating system or hardware. This platform can be accessed from any desktop, tablet, or mobile device – all you need is an internet connection.
How to Install TruView Software and Files
If the project folder contains a "TruView" folder, then continue reading for how to download and use the TruView software and files.
The TruView file format is LGS or LGSX. This data contains the 3D Panoramic view of the scan data for each scanner location. You will need to use either the TruViewPortable (no installation required) or the full TruView Software Installation to view the LGS\LGSX files.
Click here to download Leica TruView from our servers (see options available below)
Option 1 - TruView Portable is a viewer that does not need to be installed and can be placed on a USB stick or drive and transferred with the LGS data.
Option 2 - TruView Install is a standard Windows software that can be installed and run to view the LGS data. (This is the recommended option). If you have a 3D VR headset, you can also download the TruView VR software from this location to utilize the VR interface.
Installation and Performance Optimization Guide
- Hardware Check: Ensure your machine meets the requirements: Windows 10 or 11, at least 8GB RAM, dedicated video card with 1GB memory.
- Download: Access TruView via the link above. Choose between portable or full installation options on Google Drive. Download the files one at a time.
- Installation: For full installation, unzip the downloaded file, run the .exe file, and click ‘yes’ for admin rights. Follow the prompts, ensuring NET Framework 3.5 is enabled.
- Optimization: If your laptop has dual video cards, you can follow this procedure. Set TruView to utilize the high-performance graphics card. Right-click Desktop > Display Settings > Graphics > Browse for TruView.exe file > Add > Options > High Performance > Save.
- Testing: Confirm TruView is using the high-performance card by checking the task manager. Right-click the taskbar in Windows > Task Manager > Processes > Verify GPU usage.
- Troubleshooting: If issues persist, update graphics drivers or consider installing TruView on a different machine that matches the hardware requirements.
How to Make the Most of TruView Software and Files
- Open TruView by either double-clicking on the TruView application or dragging and dropping the LGS file onto the TruView interface.
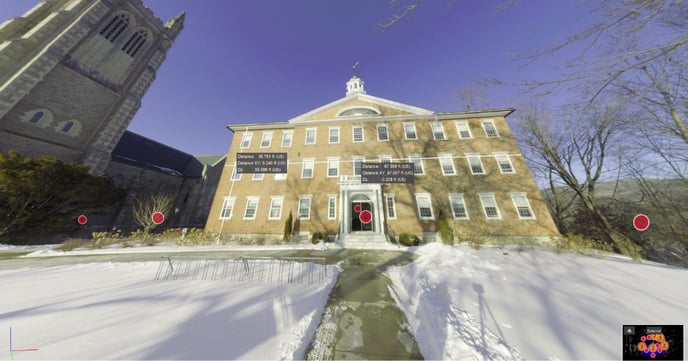
- Upon opening the file, you'll be presented with the sitemap view, which displays each scan location as a red dot. Zoom in and out using the middle button wheel on your mouse.
- To pan around the sitemap view, press and hold the right click on your mouse, then drag left to right.
- Double-click on a red dot to enter the first-person (bubble) view of that scan location. This view provides a 360-degree perspective of the scanned area.
- Navigate between scan locations by double-clicking on other red dots on the sitemap view.
- In the first-person view, utilize tools such as the dimension tool to take measurements between points in the scan data.
- Adjust visualization settings by accessing the panel on the right side of the interface. You can toggle point cloud data, change color modes, and control visibility options.
- Use the site maps feature on the left side to navigate between different levels or sections of the scan data.
- Take advantage of additional tools such as clipping boxes to focus on specific areas of interest within the scan data.
- Take screenshots of your navigation within TruView using the WIN + SHIFT + S.
If you encounter any issues or need assistance, access the TruView help documentation by clicking on the question mark icon in the upper right of the interface.
Existing Conditions 3D Laser Scanning Services
Over the past 27 years, we have measured, documented, and modeled over 10,000 buildings spanning over 700 million square feet across the United States, establishing ourselves as an industry leader in 3D laser scanning. Architects, builders, engineers, developers, facility managers, trust our 3D laser scanning company to deliver digital representations of the as-built environment with unparalleled accuracy and efficiency. Our dedicated Project Managers provide fast and accurate 3D laser scanning services and drone imagery services, and expert CAD and BIM technicians create custom, detailed deliverables. Our greatest reward remains delivering superior-quality scan-to-BIM work and knowing we played a vital role in our clients’ unique and historic projects.
Related Articles


.svg)


